Bridge Command - Using Bridge Command 4.5
A 3d navigation and ship handling simulator
Introduction
Bridge Command 4 is an interactive ship simulator programme. Its aim is to be a training tool for navigation, ship handling, and other seamanship skills. Bridge Command is free, and is available for commercial and non-commercial use.
For a more in depth, tutorial based introduction to Bridge Command, please see the tutorials.
Running Bridge Command
When you start Bridge Command, you will be presented a list of available scenarios. You can select a scenario with the mouse or arrow keys. You will see some information about the scenario you have selected. When you have chosen which scenario to load, this is done by pressing enter, or clicking the 'Load Scenario' button.
There is also a 'New Scenario' button, which will allow you to set up a new scenario, as described in Scenario Writer, and a 'Change settings' button, to modify Bridge Command's settings.
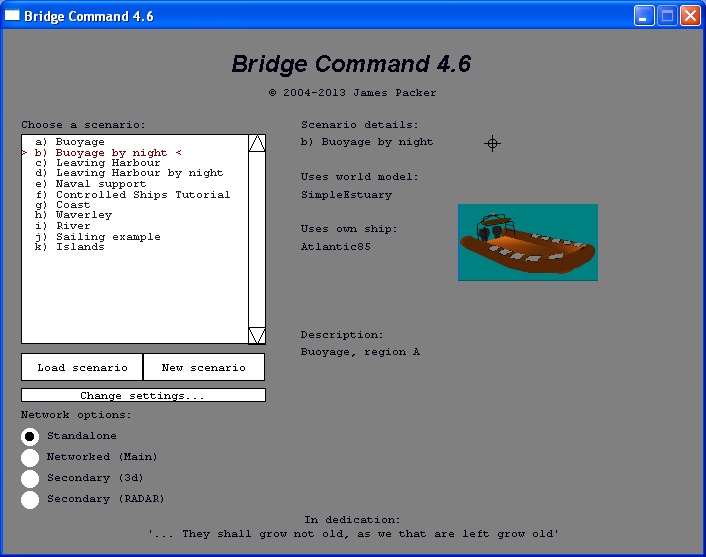
Below the scenario list, there is a list of options for networking. These allow Bridge Command to be used on multiple screens, or with an instructor running an exercise using the Map Controller. For normal operation, this can be left at its default of 'standalone'. For information on using the networking options, please read the document which describes its use: The Map Controller, or the tutorial.
After this, the scenario will load - this may take a substantial time, possibly in minutes on a slow machine, although this is an extreme case. Please be patient.
When the scenario has loaded, you will be presented with a screen similar to the one below:
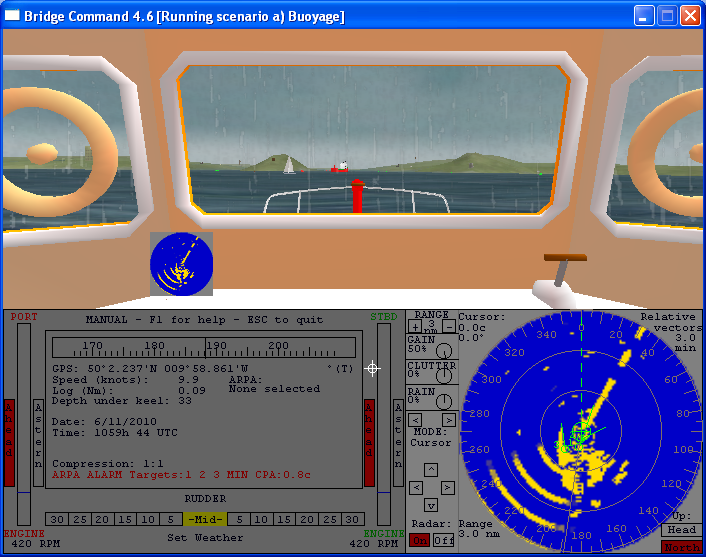
You will see that the window is split into three panes. The top view is of the simulated world. The lower left contains your controls and instrument readouts. The lower right shows a radar simulation.
The programme has two basic modes of operation, manual and automatic. The programme starts in manual mode, where you controll the movement of your vessel through its rudder and engines. To change into Automatic mode, where you set the bearing to travel on and your speed directly, press F3. To return to manual, press F2.
In general, control of the settings is by mouse, and the view is with the keyboard. Ship controls are either slider or button based - To set engine revolutions in manual mode, and speed and bearing in automatic, click or drag the slider indicator to the location you require. The direction (ahead/astern) and rudder is controlled with buttons or a horizontal slider. With the rudder buttons, click on the one you require, and it will be set and highlighted in red. For the engine controls, the left mouse button controls one engine, and the right mouse button controls both together.
To change the weather (wind and sea state, visibility and rain), move your mouse over the 'Set Weather' area below the rudder. Dials will appear, which you can turn with your mouse to set the weather, wind direction, visibility and rain intensity.
It is also possible to use a physical wheel and throttles with Bridge Command. Read details of this in External Controls
The view and simulator controls are as follows:
| Key | Modifier | Effect |
| Arrows | Look around | |
| Arrows | Control (Ctrl) | Look around at points of ship (Ahead, Port, Starboard and behind) |
| Space | Change viewpoint on vessel (if more than one set) | |
| Arrows | Left shift key | Display and move a bearing marker in the 3d display. |
| B key | Sound horn | |
| F1 | Help | |
| F2 | Manual mode | |
| F3 | Automatic mode | |
| F4 | Magnify view ('binoculars') | |
| F5 | Normal view | |
| 0 | Pause simulation | |
| 1 | Real time simulation | |
| 2-6 | Increasing degrees of time compression (2,5,15,30,60 x) | |
| 7 | Full time compression in automatic mode only (3600x - 1 hour per second) | |
| ESC | Exit Bridge Command |
The radar starts in 'standby' mode, and can be switched on by clicking the radar 'On' button in the lower right of the screen.
The radar has controls for range, gain and clutter reduction, which are controlled with the mouse, and can be used in north up or head up modes. These are also selected by clicking the buttons at the bottom right of the radar. Additional controls are available, and can be selected by using the < and > keys in the radar 'MODE' section. Further details of use of the radar are available in the radar tutorial.
If you run aground, you must unground yourself by going in the opposite direction - So in the most likely case that you were going ahead, go astern to pull free.
I would like to thank all those who have kindly agreed for their models to be distributed in this release of Bridge Command.
- Ragnar
- Juergen Klemp
- Simon D Richardson
- Jason Simpson
- Thierry Videlaine
- NETC (Naval Education and Training Command)
- Many thanks to Ken Trethewey for making his images of the Eddystone lighthouse available.
Feedback is welcomed and encouraged to the author - send me an email.